
by Lisa | Dec 18, 2020 | Entrepreneur, Facilitation, Productivity, Technology, Visual Thinking
In 2020, working remotely became the norm rather than the exception. Many companies plan to continue with their work-from-home arrangement into 2021. What does this mean for you? Virtual meetings are here to stay, so it’s time to set up your home office with productivity tools to stay on target with your 2021 goals and ensure your virtual meetings run smoothly. Here are my top tools of 2020 to help you stay up to date on the latest and greatest work-from-home gadgets.

In 2020, we saw a sudden increase in the use of video conferencing. Mainly due to the pandemic restrictions.
Online meetings replaced face-to-face meetings and video conferencing became a regular means of collaboration.
In fact, working remotely is now the norm rather than the exception.
Although restrictions vary based on region, many companies prefer to continue with their work-from-home arrangement. Just recently, Google and Facebook announced that they will continue with their remote work arrangement for now.
What does this mean for you? Virtual meetings are here to stay! It is important to set up your home office with productivity tools to stay on target with your 2021 goals, and video conferencing equipment to ensure your virtual meetings run smoothly.
To help you stay up to date on the latest and greatest work-from-home gadgets, here are my top tools of 2020 that I keep in my teleworking toolbox.
1. Microphone/Headsets
The last thing you want during your video conference is terrible audio!
People should hear you clearly during your virtual meetings and using only your computer’s microphone may provide a poor audio experience.
Adding a superior external microphone or headset to your virtual meeting toolbox will ensure your audience can hear you properly during virtual meetings.
There are several microphone brands on the market to give you crisp, clear audio. Do consider if you are uncomfortable sitting in front of a microphone, and if so, go for a headset instead.
While a wired headset is a great choice, the wiring and cabling creates limitations.
You can go for the Bluetooth models that offer comparable audio quality; however, they are a bit more expensive.
Lastly, if your work-from-home environment is loud, minimize distractions by opting for a noise-cancelling headset.
Personally, I prefer a microphone, and recommend the SNOWBALL Microphone.
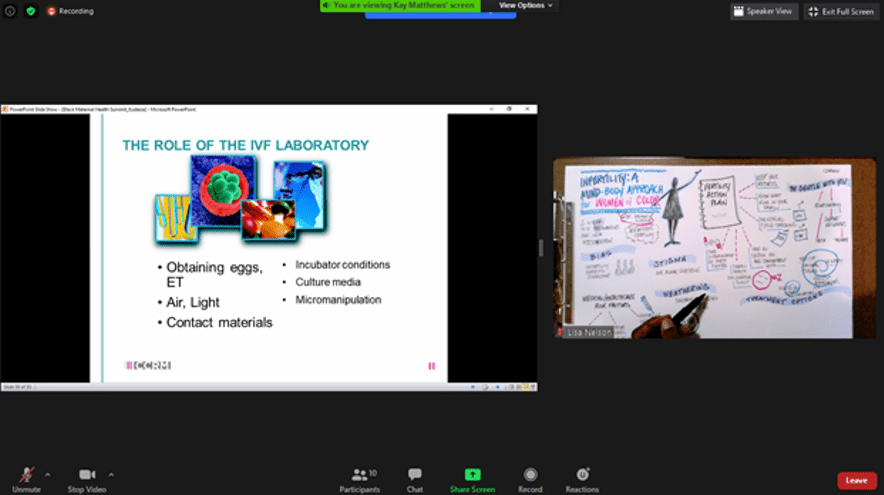
2. Document Cameras
Document cameras are a small and powerful replacement for transparency projectors, This specifically designed web camera projects crisp and clear images onto a display, a great addition for virtual meetings and presentations!
I use the IPEVO V4K Ultra High Def Document Camera. It allows me to draw and have meeting participants see me working on a sheet of paper. My version of the Ipevo is old and it doesn’t even have a light but I still love it.
However, the IPEVO VZ-X 8MP Document Camera has a light and WIFI included if you are interested in those specs.
A third option, that a colleague of mine raves about, is the INSWAN INS-1 Tiny 8MP USB Document Camera.
At the Black Maternal Mental Health Summit, we used our document camera alongside the Powerpoint presentation as a means to visually communicate with the attendees of the event.
3. Lighting
Invest in good lighting!
Although natural lighting can be good enough for some video conferences, better lighting improves your video quality.
If your desk is located in a darker area of your room, there will be no need to find the right angle if you have a to brighten up your workspace!
With a proper lighting device it will be easier to video call at any time, including night.
I recommend the Neewer Ring Light Kit that comes with a tripod stand, dimmable LED lighting and color filters.
Looking for a more affordable LED Ring Light option that can hold your phone, has an adjustable color temperature range, and can clip on your desk or laptop? The UBeesize Selfie Ring Light checks all of those boxes and is compact and quite versatile!
In summary, the top three specifications to consider when purchasing your video conference lighting device are its dimmability, does it have the option to control the color temperature, and whether it provides adjustable positioning.
4. Traditional “Lo-Fi” Office Tools
Aside from the tech gadgets mentioned above, there are three key office tools that I recommend for seeing the big picture with visuals.
I love this UCreate Sketch Book, it’s always on the right-hand side of my desk, right next to my mouse where I put all of my notes. You can easily turn the sketch book from profile to landscape orientation, allowing for less restriction. There are also no lines, so you can sketch and doodle to your heart’s content!
Keep a Bullet Journal handy, specifically one that includes a dotted grid to make note-taking easy and increase productivity.
Lastly, every year I order a new wet & dry erase wall calendar which is located above my desk so that I can easily add, remove or revise events and goals. I love seeing the year at a glance, because I’m a visual person of course 🙂
Leave a comment and tell us about your favorite work-from-home tools!
Photo by Tima Miroshnichenko from Pexels
by Lisa | Aug 28, 2019 | Facilitation, Productivity
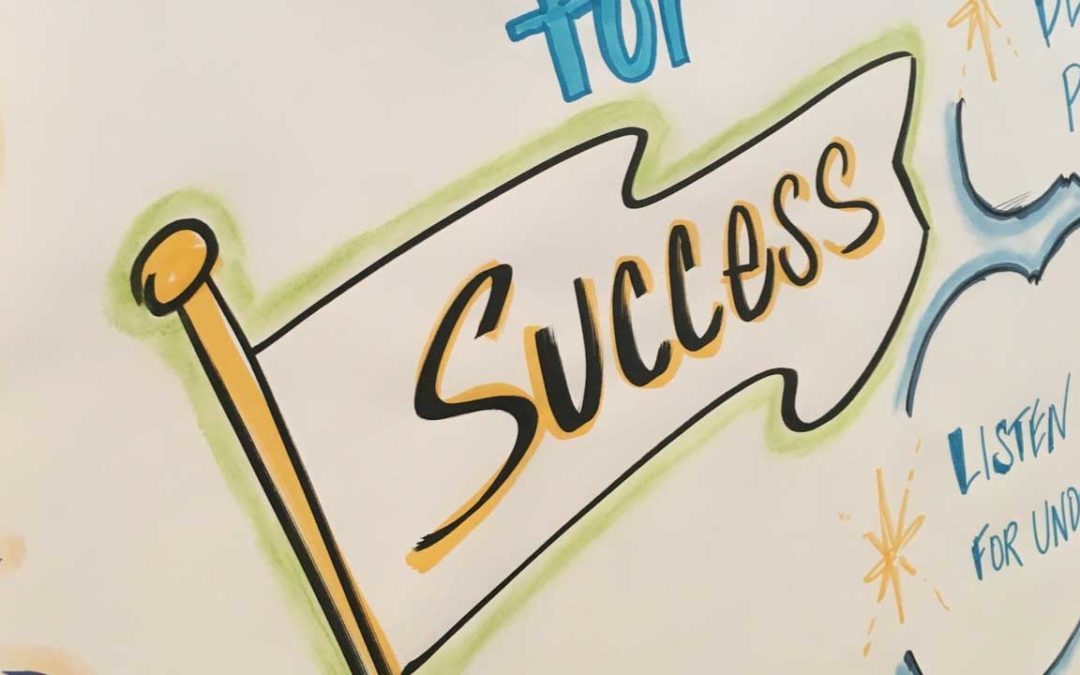
Upcoming brainstorming session on the schedule? We have some go-to bits of advice for you to incorporate into your next team brainstorming meeting to ensure that the time together is a success! These are the 5 ground rules for facilitation a brainstorming session for you and your team.

Rule #1 – There are no dumb ideas
Encourage your team to share any and all ideas throughout the process. Make the disclaimer at the start of the session that each idea is a great one and could lead to a stream of thoughts that could benefit the rest of the group.
Rule #2 – Replace any instances of ‘but’ with ‘and’
Use any idea as a chance to build on ideas and not tear them down. Instead of rebutting an idea, add to it and see where it could lead. This also goes back to the first rule of encouraging everyone to share everything. Create a safe space.
Rule #3 – The more the better
You want to focus on the number of ideas as well. The more you throw out there, the more you can evolve ideas into something really spectacular. Consider a speed round of sorts to get team members to not second guess their ideas and contribute to the number of ideas in the group.
Rule #4 – Everyone participates
As a facilitator, you will need to keep up with who is and is not contributing. No need to call anyone out on this, but encourage those who have not spoken up to share what they are thinking. The more quiet team members may have been in deep thought over an idea and just haven’t felt confident enough to share just yet. Give them the opportunity to contribute.
Rule #5 – No distractions
Tell team members to silence phones and shut down laptops. You may need to collect all technology at the start of the meeting if you are worried about team members being tempted to check those notifications. Use your own discretion.
These quick and easy rules can really improve a brainstorming session for your team and company! Try them out next time you have a session on your calendar. Make sure to go over the rules before starting the meeting as well to set expectations!
Need help with facilitating a brainstorming session? Check out our sketchnote services to help get ideas flowing!
by Lisa | Jul 31, 2019 | Art, Graphic Recording, Productivity
You need the right tools for the right job! Sounds like something a handyman might say but it’s true! Curious about my go-to supplies for graphic recording and graphic facilitation? Keep reading. These are a MUST for each event, meeting or conference we attend. They are full of our favorites along with some other tools of the trade. In today’s post, I am sharing all about what is in my kit! Check out the photos below as well to get a better picture.

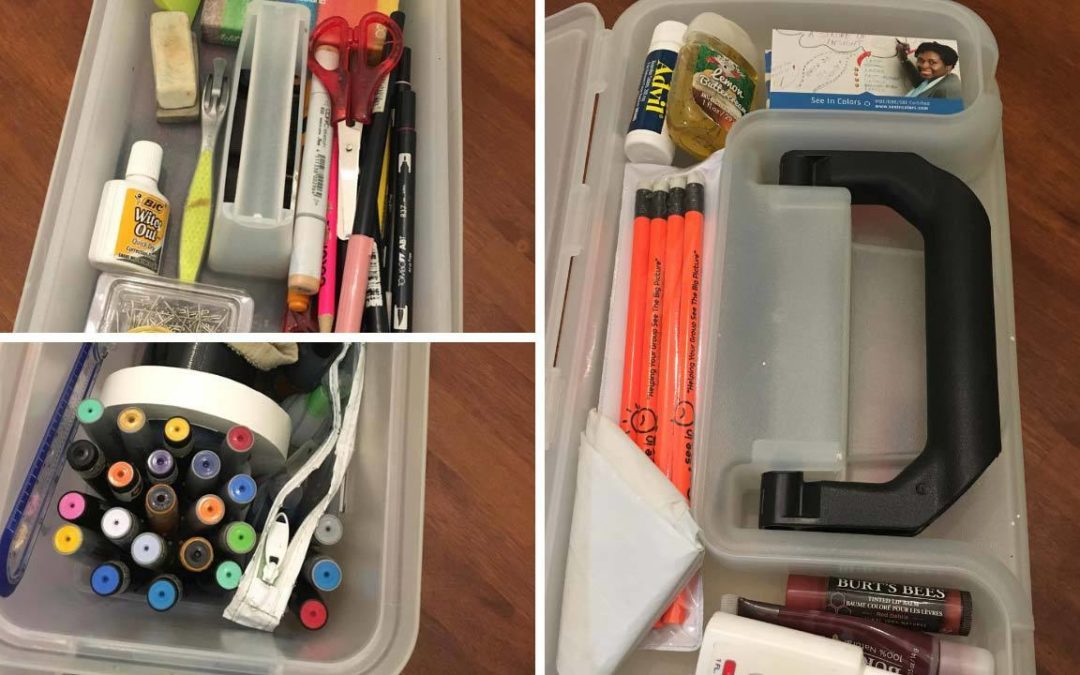
My Toolbox
My ArtBin Sidekick supply box holds everything I need with a little bit of room to grow as well! This product is perfect for when I have to travel and compact enough to take with me anywhere. It fits so well in my carry on next to my clothing and personal items. It stays locked shut, so I don’t have to worry about any ink spills happening in my suitcase. It’s super durable and effortless to clean. This product has three different sections for storage, and I have each spot filled with items.
Section One – Personal Items
This part of my ArtBin storage box has miscellaneous personal items that are great to have on hand during any job. I have hand sanitizer, lotion, business cards, and See in Colors pencils to hand out to clients and connections that I make at events. I always make sure to keep a plastic bag handy in case there is not a trash can close by, or I need to clean up some items in my workspace during an event.
Section Two – Work Supplies
In the final two parts hold the majority of the items I use during my graphic recording process! In this particular section, I have chalk, a pencil sharpener, erasers and some markers included. I always make sure to have child-proof scissors in there because they are TSA-friendly for when I travel! Whiteout is also an item I double check for when packing because it is so useful whenever I have a small error to fix or something to cover up on a drawing.
Section Three – Work Supplies (part 2)
This division holds my Neuland marker collection along with some refill ink. Artist tape and duck tape can always be found in this spot too! Duck tape is a universal go-to tool to keep in your kit. I like to keep some on hand at all times.
Want to learn how you can draw ideas with visual notes? Sign up on our interest list for the Learning Lab. Be the first to know about online courses, coaching and public workshops.
by Lisa | Oct 31, 2018 | Entrepreneur, Leadership, Productivity
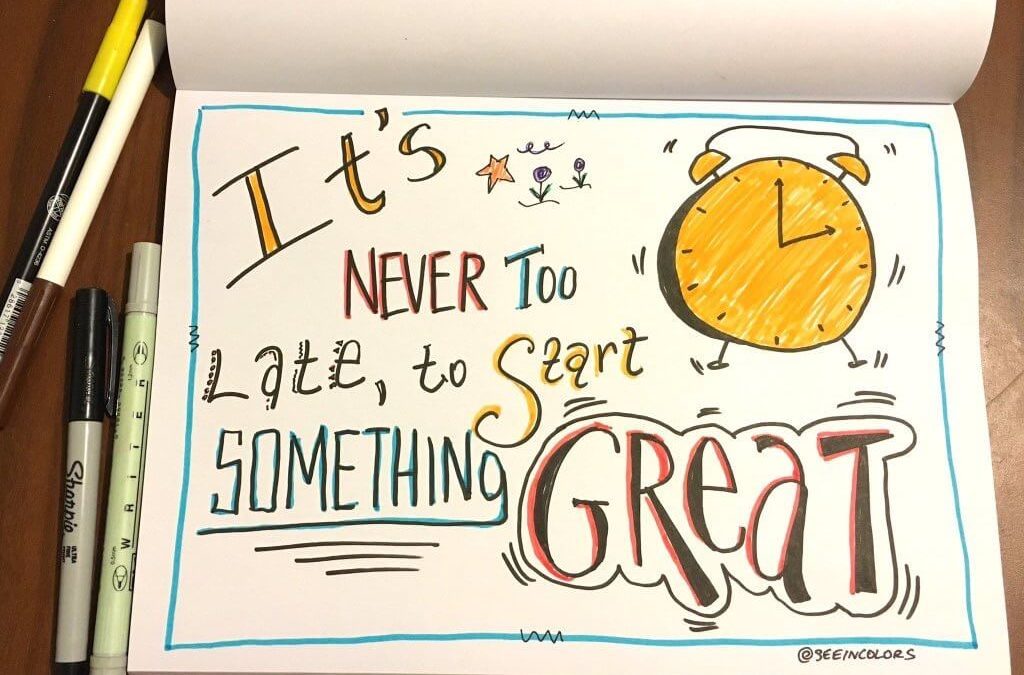
At the start of each year, I determine a word that will be the focus of my months ahead. Others may make resolutions, but I decided to ditch those ideas and just stick to one – my word. Even if you are more of a resolution person, I bet your goals all have one central idea.

Time may have gotten away from you this year. Deadlines shifted, budgets adjusted and team roles have changed. While all of that is normal in the workplace, there is still time in your year to get back on track. It is not too late!
Some action steps to help you finish out the year strong:
- Determine or rediscover your word for the year.
- Write your word down. Use our word of the year template!
- Put your word it on display. Where will you see it every day? Put it there!
- Share your word with a friend. This will help keep you accountable and excited about your word.
Get your word back into focus for the rest of the year! Staying motivated is a huge key to accomplishing your goal. Your word of the year provides a guide for each task and activity that you work to complete. You have something that gives you clarity for next steps and ideas. If your idea/goal does not line up with your word, just know that it may be a waste of your time to follow through with it. Consider your word as a filter for the goals that you may have throughout the rest of the year.
Another key factor is to make your word as appealing as possible. Having your word displayed in an eye-changing way can help keep your word top of mind as well. So make sure to use our word of the year template or if you want something more custom to share, contact us!

by Lisa | Oct 17, 2018 | Entrepreneur, Graphic Recording, Productivity
Encourage creativity and energize learning in your team with sketchnotes! This visual way of sharing information can be just what your company needs to jumpstart brainstorming. No more black and white handouts. Bring some color into the mix.

So what exactly are sketchnotes?
Sketchnotes are a very visual way of capturing information. Incorporating a mix of handwriting, doodles, lettering and more, sketchnotes are not your typical pen and paper note-taking. It is the visual design of verbal information, each “sketch” representing a piece of information.
There are two ways you can incorporate sketchnotes into your workplace. Check out our ideas below to see how to share these ideas in your office!
Help explain difficult concepts with sketchnotes. Create sketchnotes and pass them out to your audience. You can guide them throughout the visual during your presentation. Draw their eyes to specific portions of the sketchnote page in front of them. You can also show the sketchnotes on a screen, zooming in to different parts and walking your team through the information provided.
Long day in the conference room? Encourage your team to create their own sketchnotes. Get the team excited by introducing a new, interactive way to participate in meetings. Provide everyone with blank paper and materials. Markers, pencils, pens and more. Give them time at the start of your day to select their supplies before you get started. Provide a few sketchnote pointers and then allow them to create! As you share, watch them engage with their sketchnotes, getting down each piece of information in a fun, fresh way. Have each member share at the end of the presentation as well! Let them show off their creations.
Create your own cliffnotes. Reading through a business book? Writing your own novel? Use sketchnotes to create idea maps and follow along with plotlines. This visual can help with your ability to retain the information and remember clearly at a later date.
Need more tips? Download our FREE Visual Note-Taking Tip Sheet.
Learn the basics of sketchnoting and how you can implement this practice in your workplace through our services! Can’t wait to see what you create!
by Lisa | Oct 3, 2018 | Art, Entrepreneur, Graphic Recording, Productivity, Social Media
Bullet journaling has become a huge source of creativity and productivity for creatives across the world. Originally created by Ryder Carroll, this style of record keeping can be as simple or as complex as you need it to be.

In this day and age, it can be hard to keep track of everything in one place. Even with technology, it can be hard to get everything down. Pen and paper can be the way to go. A bullet journal provides a way for you to be organized in a creative way. From tracking your water intake, keeping up with tasks to dreaming big with a bucket list, your bullet journal can hold as much information as you like.
Bullet journals can be a gamechanger in the workplace. Take a break from your technology and use your bullet journal to plan strategically, organize your thoughts and keep track of your calendar. Bullet journals can provide a full visual and creative freedom that computer screens would limit. This style of note taking can also liven up meetings as well. Repetitive operational meetings can get boring, but by adding notes to your bullet journal it can boosts creativity during those long days in the boardroom.
Getting started with your bullet journal:
- Find your journal – Decide if you want lined or blank paper, dotted versus gridded, etc. You can get a large journal or start smaller. The key to bullet journaling is customizing it to your needs.
- Figure out your topics – What do you want to include in your bullet journal? Consider creating a brain dump page before you get started. *Important note – make sure to skip a few pages at the beginning of your journal to leave room for your index.
- Create your index – Consider your index your “table of contents” for your bullet journal. This will serve as your guide for finding specific information in the future. This portion will be extremely helpful once your bullet journal becomes full of your notes. Also, make sure to number your pages to keep with completing your index.
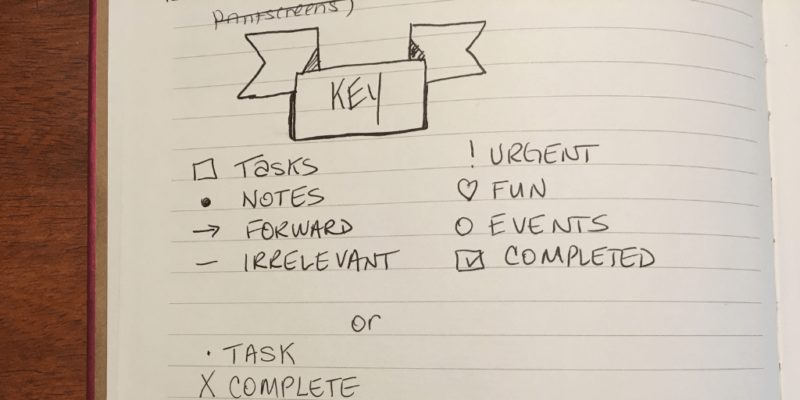
- Design your key – Your key will have various indicators for your task lists. A simple dash “-” can serve as a general indicator of a task, while other symbols should be designed for different categories for your tasks. Design markings for tasks once you have completed them, moved to a different date or canceled altogether. This can evolve over time, but having a general guide is helpful.
- Make it your own – Having an initial setup of pages and topics is great to get you started, but the main purpose of bullet journaling is making it your own. Search online for inspiration. Get ideas for layouts, content and more. Be sure to add some fun icons to your bullet journal with our visual note taking sheet!
Need some more inspiration? See photos of my journal below. Can’t wait to see what you create!